
With the festive season fast approaching I wanted to share these simple yet effective DIY 3D stars. These pretty paper stars are a fun holiday craft activity that is easy to do and they really look stunning. They can be used as a garland, hung by thread from the ceiling or a tree branch or simply propped up on a mantle for a festive fireplace.
The thing I love about these 3D stars is not only how easy they are to make but also how versatile they are. Change up the paper with bright pastels for summer, blue and white for Channukkah, creams and golds for New Years or the classic red and green for Christmas. It’s so nice to have handmade decorations in your home and Christmas and extra nice when you’ve made them yourself and they haven’t broken the bank!
I’m a big fan of simple paper projects especially when they don’t take up much time or money. So trust me when I say these are a total budget-friendly project that anyone can make. All you need is two squares of Butterfly paper, a pencil, a pair of scissors and some glue to make each star.
Supplies:
- Butterfly board or paper
- Scissors
- Pencil
- Double-sided tape or paper glue
Want to make it even easier? You can download and keep this tutorial in a handy PDF here complete with templates to make large, medium and small 3D Paper Stars.
How to make 3D Paper Stars.
1. Take a square of paper and fold in half. Open out, rotate 90 degrees and fold in half again.
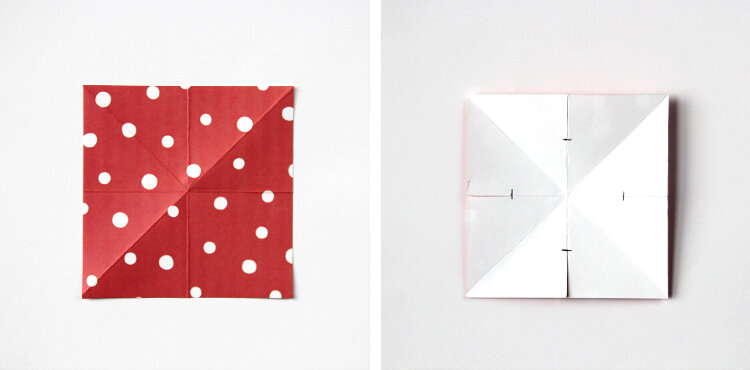
2. Open out and fold your paper in half again this time along both diagonals.
3. Flip the paper over and mark a little less than halfway down each of the horizontal and vertical creases.
4. Cut down to the pencil marks.

5. Fold the paper in on each side of the cut to form a point.

6. Repeat on all remaining sides.
7. Apply glue or double-sided tape to 1 side of each of the points.

8. Peel back the tape and fold 1 side of the point over the other and stick down.

9. Do the same on the remaining points to make half a star.

10. Repeat the steps above to make the 2nd half.
11. Apply some more glue to the centre corners or each point.

12. Stick both halves together making sure the points are at 45 degrees from each other.
13. Leave to dry and hang.
That’s it, you’re done! Have fun creating your own decorations and be sure to share them with us on our Butterfly Facebook page!
Disclaimer: This article was originally sourced from gathering beauty.